
Sand is a crucial material used in various construction projects, making it essential to ensure its quality and suitability for specific applications. To achieve this, good sand testing methods are employed to measure its important parameters, which can impact the performance of concrete, mortar, and other construction materials. In this article, we will explore the different sand testing methods for construction and how they play a vital role in ensuring the integrity of construction.
Table Of Contents:
Method 1: Sieve Analysis
Method 2: Moisture Content Test
Method 3: Specific Gravity Test
Method 4: Compressive Strength Test
Method 5: Bulk Density Test
Method 6: Permeability Testing
Method 7: Analyzing Organic Content
Method 8: Test for Soundness
Method 9: Analysis of Shape and Surface Texture
Methods for Sand Testing in Construction Projects
Method 1: Sieve Analysis
 Sieve analysis is a basic sand testing method used in construction. The sand is passed through a series of standard sieves with varying mesh sizes. The distribution of particle sizes is determined by measuring the weight of sand retained on each sieve. Sand grading is critical to producing a strong and workable concrete mix, so sieve analysis is an important tool for quality control.
Steps in Sieve Analysis:
Apparatus:
- Stack of test sieves
- Balance (with an accuracy of 0.01g)
- Rubber pestle and mortar
- Sieve shaker
- Oven
The balance used should be sensitive to 0.1% of the total weight of the sample taken.
Sieving Procedure for Sand Testing:
Step 1: Take an over-dried sample of approx 500g.
Step 2: If the particles are lumped, use the pestle to crush the lumps but not the particles.
Step 3: Determine the exact mass of the sample - Weight(g).
Step 4: Make a test sieve stack. The sieves are stacked in ascending order, with the largest aperture size on top and the smallest at the bottom. To collect samples, a receiver is placed beneath each sieve.
Step 5: Separately weigh all of the sieves and the pan.
Step 6: Pour the samples from Step 3 onto the top of the sieve stack and secure the lid. Place the stack in the sieve shaker and tighten the clamps, set the timer for 10 to 15 minutes, and turn on the shaker.
Step 7: Stop the sieve shaker and weigh each sieve to retain soil/material.
Users can analyze the results once the entire procedure has been completed. After the experiment, the starting sample weight should be recorded and compared to the total sample weight retained on the sieves. If the weight of the finished sample deviates from the initial weight by more than 2%, the analysis and sample should be discarded. Technically, sample losses can lead to analysis errors and inaccuracies.
Method 2: Moisture Content Test:
 Moisture content is an important factor to consider when testing sand for construction. Excess moisture can weaken the concrete mix, whereas insufficient moisture impacts workability. The moisture content test involves weighing a sand sample before and after it has been dried in an oven to determine the percentage of moisture present. This ensures that the sand used in construction has the proper moisture level for optimal performance.
Procedure for Moisture Content Test
Apparatus:
- A frying pan or Metal tray
- Scales to measure
- Gas stove or an electric hair dryer
Here are the steps to find moisture content in sand, referring to IS Code 2386-3
- A 2 Kg sample is required for coarse aggregate, but a 0.5 kg sample is sufficient for fine aggregate.
- Wet weight(W) is then assigned to the wet sample.
- After that, gently heat the sand on a metal plate or frying pan, stirring with a glass or metallic rod to maintain uniform heat distribution, until the moisture sheen on the surface disappears.
- When the surface of fine aggregates begins to show free-flowing characteristics, it becomes dry (Wd), the weight of this oven-dried sample.
- Overheating must be avoided because it will result in insufficient surface moisture.
Sample Calculation:
moisture content formula = [(W-Wd)/W *] 100%
-
Wet or Moist Sand Sample Weight = W = 600 gm
-
Oven Sand Sample weight = 500 gm
Surface Moisture Content of Sand Sample = (600 – 500) / 600 ) x 100 % = 16.67%
Result:
From the above calculation, we can say that the sand sample has 16% moisture content by weight.
Method 3: Specific Gravity Test:
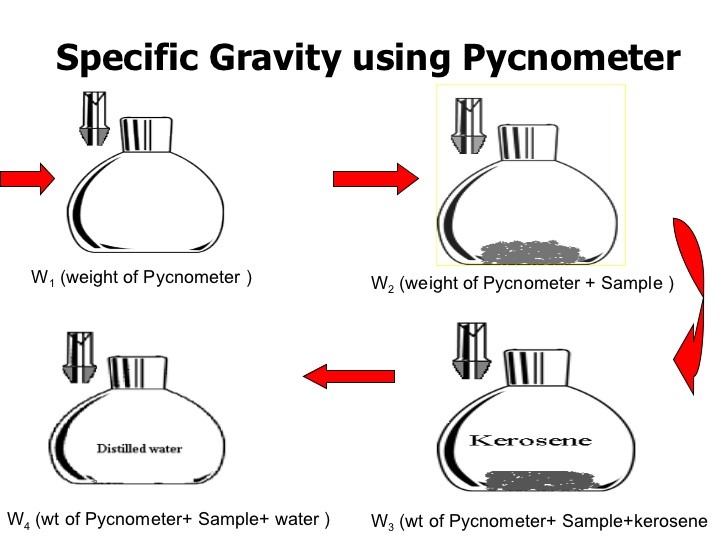 Specific Gravity Test - Assessing Sand Density: Specific gravity testing is another crucial sand test method used in construction. It determines the density of sand particles relative to water. The test is conducted by comparing the weight of a given volume of sand to the weight of an equal volume of water. Specific gravity testing helps assess the sand's quality, density, and suitability for various construction applications, particularly in concrete mixes.
Steps for Gravity Test Procedure for Fine Aggregate
- Adjust the pycnometer.
- To the nearest 0.01 gram, weigh a clean, dry pycnometer.
- Fill the pycnometer with distilled water at room temperature. Check that the bottom of the meniscus is parallel to the calibration mark.
- Weigh the pycnometer and water together.
- Make a graph or table for the pycnometer you're using.
Calculation:
Specific Gravity (SG) = (wet sand weight in air) / (wet sand weight in an equal volume of water)
First, determine the weight of dry sand and an equal volume of water to calculate the specific gravity of sand. To calculate the specific gravity of sand, divide the dry sand's weight by the water's weight. Because specific gravity is a dimensionless quantity, it lacks units. The specific gravity of typical construction sand is usually between 2.5 and 2.9.
Silt Content Test as per IS Code -
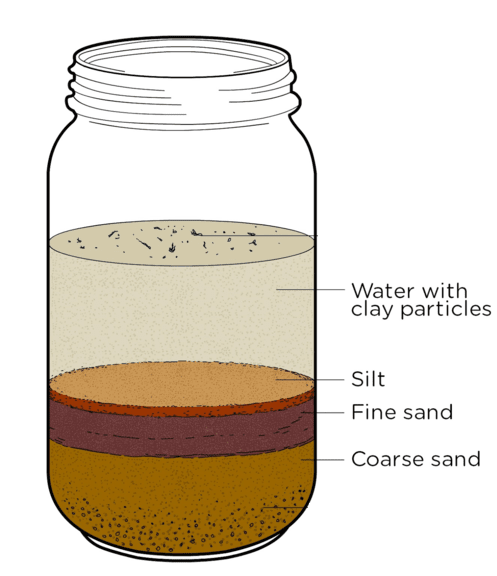 Evaluating Impurities: The silt content test is conducted in accordance with the Indian Standard (IS) code to assess the presence of impurities like silt in sand. Excessive silt can negatively impact the strength and durability of concrete and other construction materials. Following the IS code guidelines, construction professionals can ensure that the sand meets the required standards and is free from harmful impurities.
Apparatus:
- Measuring Cylinder - 250 ml
- Sand - Specimen
- Water
- Salt Solution
Test Procedure:
- The measuring cylinder should be dry and free of moisture
- Fill 50 ml of water with a 1% salt solution
- Fill the cylinder with sand until it reaches a volume of 100 ml
- Add salt solution to the level of 150 ml once more
- Finally, close the cylinder’s mouth and shake vigorously, then place the cylinder on a flat surface
- After 2 hours, the silt content should have settled over the sand layer
How Do You Calculate the Percentage of Silt?
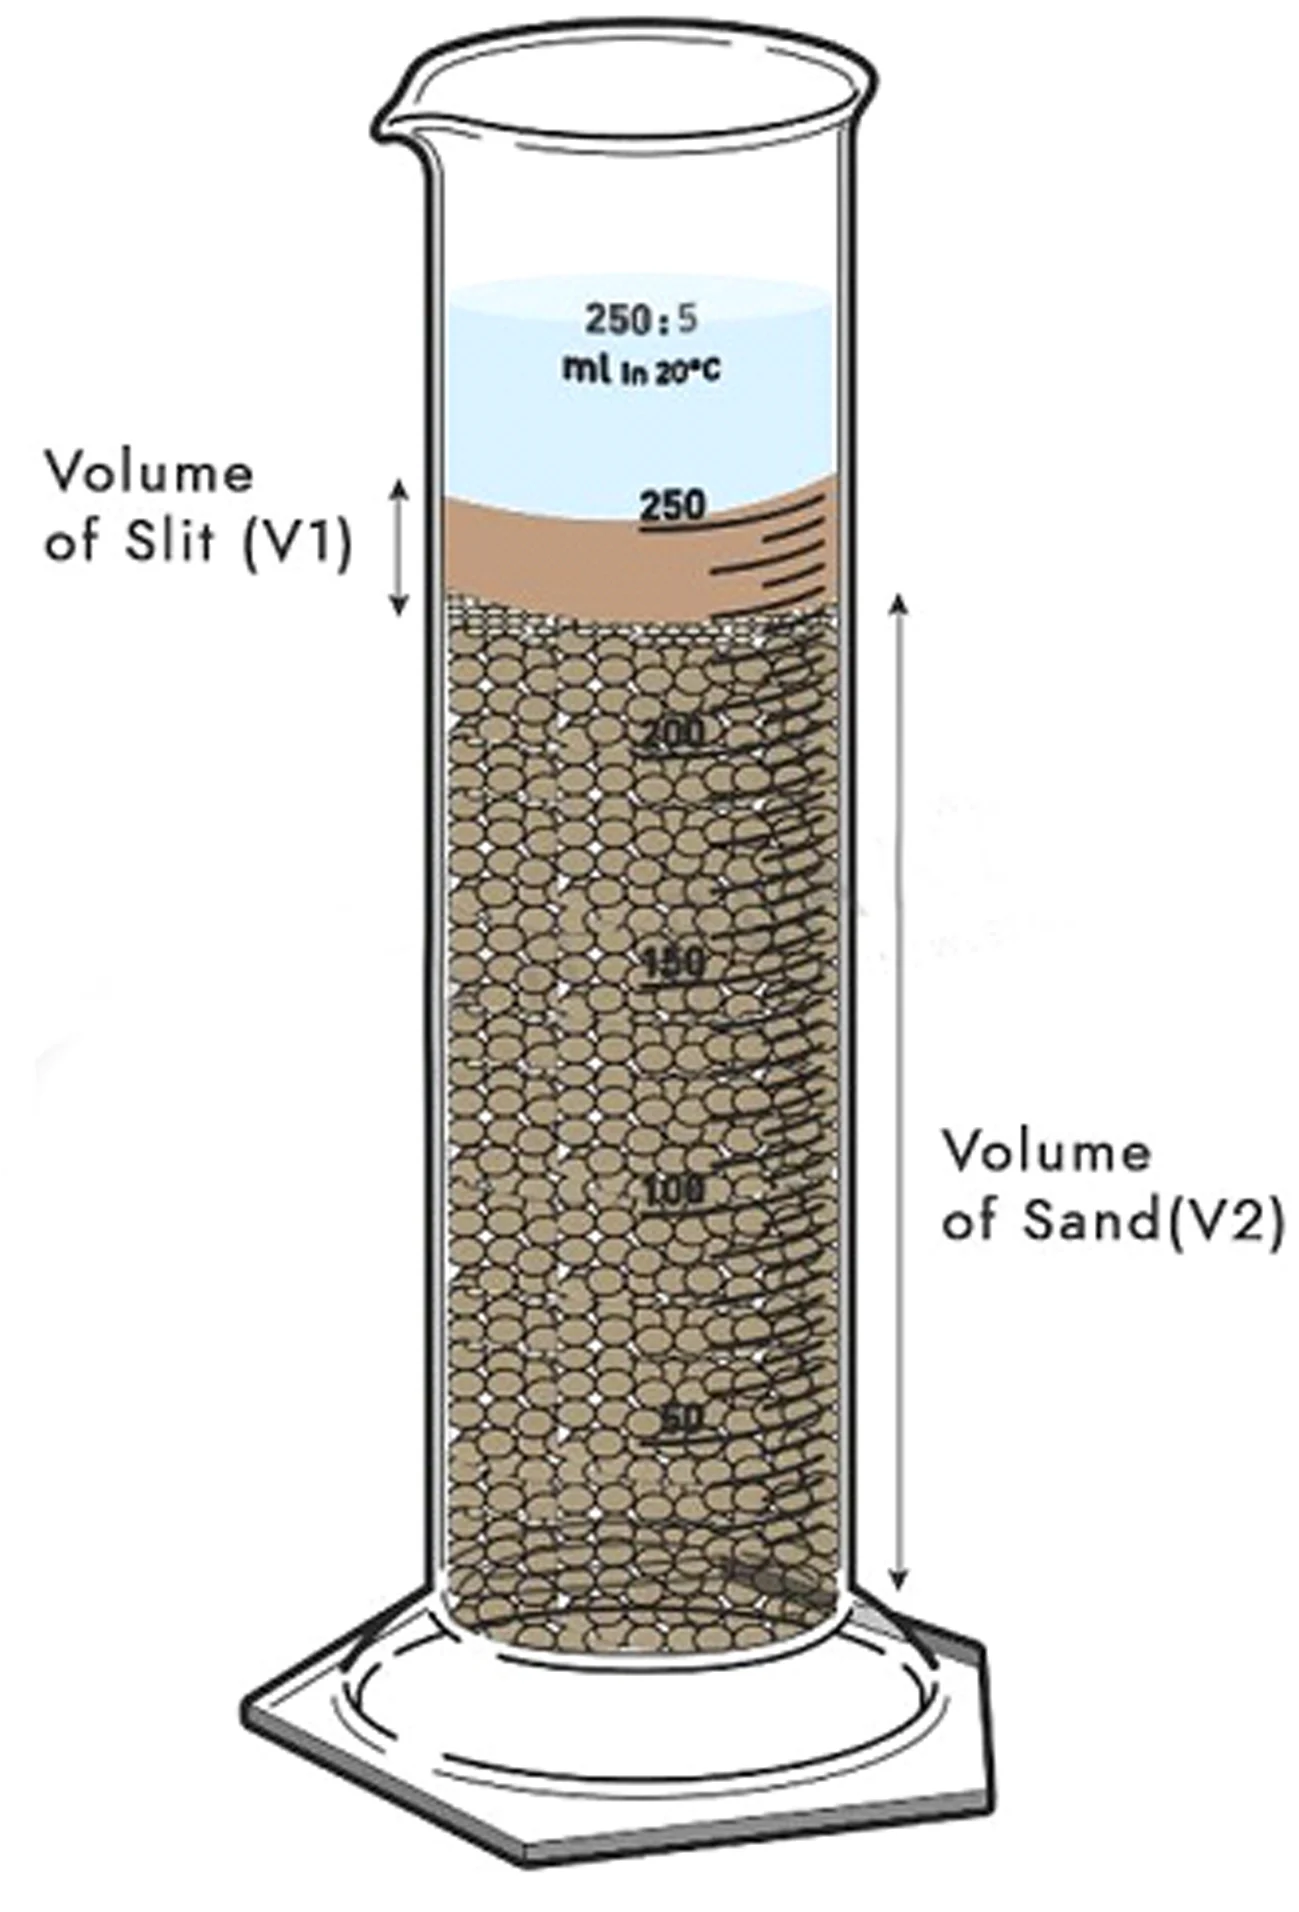
V1 = Volume of silt layer
V2 = Volume of the Sand layer
Silt Content Formula:
Percentage of Silt = (V1/V2)*100
V1 = 16 ml and V2 = 136 ml
% of silt content = (16/136)*100 = 11%
Method 4: Compressive Strength Test
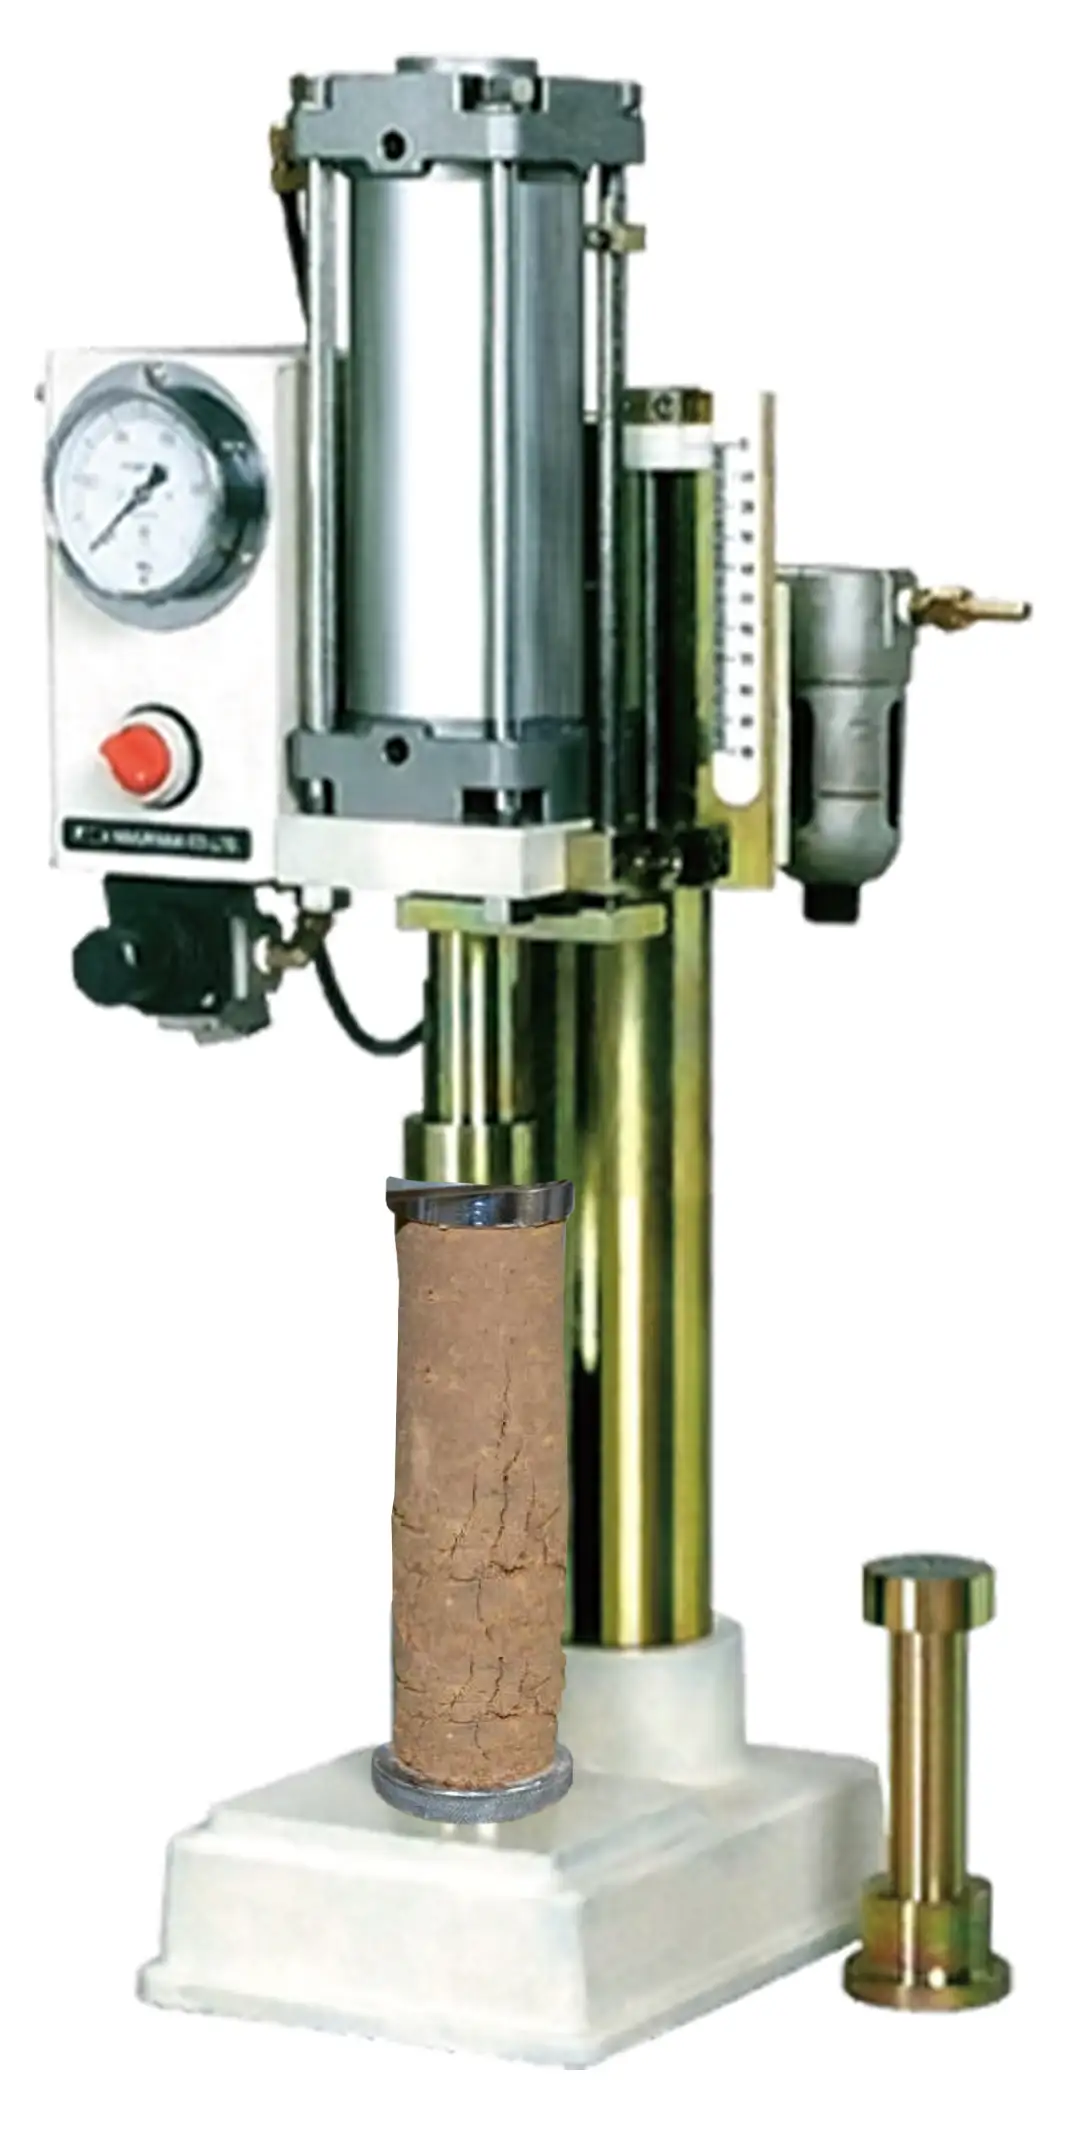 Evaluating Sand’s Impact on Concrete: Compressive strength testing is an important method for testing sand in construction. This test consists of making concrete samples from tested sand and subjecting them to compressive forces to determine their strength and load-bearing capacity. Construction professionals can determine the sand's influence on the overall strength of the concrete mix and ensure that the mixture meets the desired performance requirements by conducting compressive strength tests.
The sand quality used in concrete has a significant impact on its strength, workability, and durability. Here are the steps to determining how sand affects concrete:
Gather the Required Materials: To begin the evaluation process, gather the required materials, which include the sand sample, cement, water, and any other additives commonly used in concrete mixes.
Concrete Samples: Make concrete samples with the sand being tested, as well as the standard cement and water ratios. To achieve a homogeneous mixture, make sure the mixing process is consistent and thorough.
Conduct Compressive Strength Testing: The compressive strength of concrete is the most important evaluation. After the concrete samples have cured for the specified time, use a compression testing machine to perform compressive strength testing. This entails compressing the concrete cylinders until they fail and then recording the maximum load at which failure occurs.
Compare with a Control Sample: To understand the impact of the sand on concrete, compare the compressive strength results of samples made with the evaluated sand to those made with a control sample of known, high-quality sand. The control sample should be prepared in the same proportions and under the same curing conditions as the test samples.
Analyze the Results: Examine the compressive strength results from both the test and control samples. If the concrete made with the tested sand has a lower compressive strength than the control sample, the sand may not be suitable for high-strength concrete applications.
Workability: Besides compressive strength, consider the workability of the concrete made with the evaluated sand. The ease with which the concrete can be mixed, placed, and finished is called workability. Poor workability concrete may be difficult to handle on-site and may cause construction issues.
Conduct Additional Tests if Necessary: Depending on the specific project requirements and concerns, additional tests, such as permeability testing or chloride ion penetration testing, may be conducted to evaluate further the suitability of the sand for the intended concrete application.
Assess Durability: Consider other factors related to concrete durability, such as abrasion resistance, sulfate attack, and freeze-thaw cycles. These elements can have an impact on the long-term performance and service life of concrete.
Make Informed Decisions: Make informed decisions about the use of the evaluated sand in concrete mixes based on the evaluation results. If the sand meets the required performance criteria and has no negative impact on the properties of the concrete, it is suitable for construction use. Consider alternative sand sources that are more compatible with the desired concrete performance.
Method 5: Bulk Density Test
Calculating Sand Pore Space: A key sand testing method is bulk density measurement, which is used to determine the weight of a given volume of sand, including its pore space. This test is critical for calculating concrete mix yield, estimating sand requirements, and ensuring consistent concrete performance.
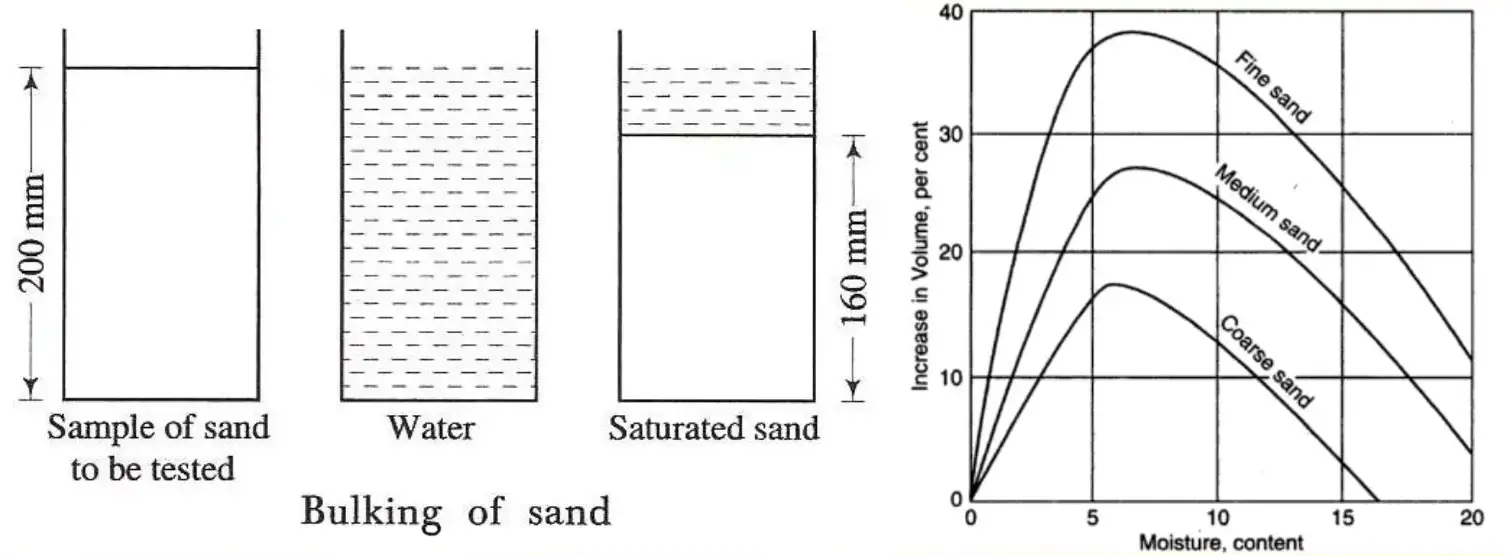
Fine aggregate has nearly the same volume when dry or saturated, but dampness causes the volume to increase. If the fine aggregate is damp when the ingredients for mortar or concrete are proportioned, its quantity must be increased to account for bulkage. The table below provides guidance only on the relationship between moisture content and the percentage of bulking.
|
Moisture Content
|
Bulking Percentage(by volume)
|
|
2
|
17
|
|
3
|
27
|
|
4
|
33
|
|
5
|
37
|
Source: Constructor.org
Method 6: Permeability Testing
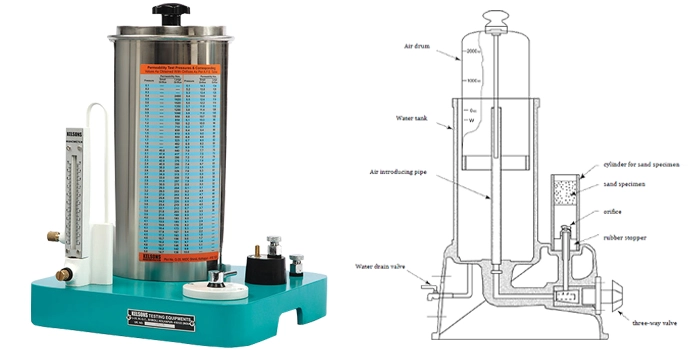 Estimating Water Flow Rate: Permeability testing is used to determine the rate at which water can pass through sand. This test is important for drainage, filtration, and backfilling applications. Understanding sand permeability aids in the selection of the appropriate type of sand for specific construction needs, ensuring that water is effectively managed within the structure.
A permeability test is required to determine a material's permeability, or its ability to allow fluids such as water to flow through it. The test aids in determining the suitability of materials for drainage applications or as part of construction quality control. The following are the steps for performing a basic permeability test:
Apparatus
- (prepared and compacted) soil sample
- Beaker or cylinder
- System of water supply
- Stopwatches and timers
Procedure:
Step 1: Prepare the Sample
- Take a representative soil sample from the site and check it for debris and organic matter.
- To obtain a homogeneous material, air-dry the soil sample and break up any aggregates or lumps.
- To determine the initial mass of the soil sample, weigh it.
Step 2: Configure the Permeability Test
- Assemble the permeameter apparatus, which is typically made up of a permeable chamber with a porous stone or membrane at the bottom to support the soil sample and allow water to flow through.
- Check that the apparatus is clean and free of obstructions.
Step 3: Placement of Soil Samples
- In the permeable chamber, place the prepared and compacted soil sample.
- Ensure that the soil is uniformly distributed and properly compacted in order to represent the in-situ conditions accurately.
Step 4: Water Saturation
- To collect the water that passes through the soil sample, place a cylinder or beaker beneath the permeable chamber.
- Fill the chamber with water and allow it to saturate the soil sample completely. Check for any air pockets or voids in the soil.
Step 5: Measurement of Water Flow
- As soon as the water begins to flow through the soil sample, start the stopwatch or timer.
- In the graduated cylinder or beaker, collect the water that passes through the soil sample.
- Calculate the volume of water collected at regular intervals.
Step 6: Permeability Calculation
- Divide the volume of water collected by the time taken to calculate the rate of water flow through the soil sample.
- Darcy's Law, which relates the flow rate, area, and hydraulic gradient of the soil sample, is used to calculate the permeability of the soil sample.
Step 7: Analyze the Data
- Analyze the test results to determine the soil sample's permeability.
- To determine the suitability of the soil for drainage or other construction purposes, compare the results to relevant standards or project requirements.
Step 8: Clear the Area
- After the test, thoroughly clean the permeameter apparatus to remove any soil particles and ensure it is ready for future tests.
It is important to note that the permeability test can be performed using a variety of methods and apparatus, depending on the project's specific requirements and the type of soil being tested. As a result, it is critical to adhere to the appropriate standard procedures and guidelines when administering the test.
Method 7: Analyzing Organic Content to Identify Potential Contaminants:
Organic matter in sand can cause significant issues in construction projects. The amount of organic matter in the sand is identified and quantified using organic content analysis. Concrete with a high organic content may have lower strength and be more vulnerable to chemical reactions. Construction professionals can ensure the use of clean, uncontaminated sand in their projects by determining the organic content.
The amount of organic matter in sand is determined using organic content analysis. Organic matter can have a negative impact on sand's properties and suitability for construction applications. The following are the steps for conducting an organic content analysis on sand:
Apparatus:
- A sample of sand
- The crucible or the evaporating dish
- Drying oven or muffle furnace
- Balance (to 0.01g precision)
- Optional desiccator for cooling the sample
- Heat-resistant gloves or tongs
- Cylinder with graduated dimensions
- Water that has been distilled
- H2O2 (hydrogen peroxide)
Procedure:
Step 1: Gathering and Preparing Samples
- Take a representative sand sample from the site, making sure it is clear of debris and organic materials.
- Allow the sand sample to air dry to remove any moisture.
Step 2: Weighing the Sample
- Weigh the empty crucible or evaporating dish with the balance.
- Fill the crucible or evaporating dish with an air-dried sand sample of known weight.
- Take note of the weight of the crucible or evaporating dish in which the sand sample is contained.
Step 3: Organic Matter Combustion
- Heat the crucible or evaporating dish with the sand sample in a muffle furnace or drying oven to around 440°C to 550°C (824°F to 1022°F).
- Allow enough time for the sample to combust (usually 4 to 6 hours) to ensure complete organic matter combustion.
Step 4: After-Combustion Cooling and Weighing
- After the combustion is complete, use tongs or heat-resistant gloves to remove the crucible or dish from the furnace.
- Cool the crucible or dish to room temperature in a desiccator (optional but recommended to avoid moisture absorption).
- Weigh the crucible or dish with the residue (the ash) left after combustion after the sample has cooled.
Step 5: Determine the Organic Content
- Subtract the weight of the ash (after combustion) from the weight of the initial sand sample to calculate the weight of organic matter in the sand sample.
- The organic content is expressed as a percentage of the initial sand sample weight.
Step 6: (Optional) Verification
- A verification step can be performed in some cases by adding a few drops of hydrogen peroxide (H2O2) to the ash left in the crucible or dish.
- If there are bubbles or effervescence, this indicates the presence of carbonates, which should be noted separately from the organic content.
Step 7: Analyze and Interpret
- To determine the suitability of the sand for construction applications, analyze the results and compare the organic content to project specifications or industry standards.
- Consider alternative sand sources or take appropriate measures to remove organic matter if the organic content exceeds acceptable limits.
Method 8: Test for Soundness
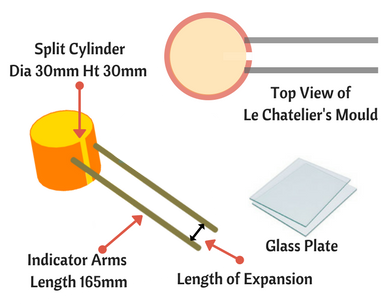 Evaluating the Resistance of Sand to Volume Changes: Soundness testing determines the sand's resistance to volume changes caused by temperature changes or chemical exposure. Sand particles with poor soundness may expand, contract, or disintegrate over time, causing cracking and deterioration of concrete. Potential sand quality issues can be detected early on by conducting soundness tests, allowing for corrective actions and ensuring long-lasting structures.
Apparatus:
- A sample of sand
- Sand cylinder or container with graduated sides
- Water Oven
- Scale or balance for measuring (accuracy to 0.01g)
- Tampering bar or tamper
Procedure for using a drying pan or dish:
Step 1: Sample Gathering and Preparation
- Take a representative sample of sand from the site, making sure it is free of debris and contaminants.
- Air-dry the sand to remove any moisture to obtain an initial dry weight.
Step 2: Sand Saturation
- Fill a graduated cylinder or container with a known volume of dry sand.
- Gradually pour in water while thoroughly mixing the sand. Continue to add water until the sand reaches saturation and no more water can be absorbed.
Step 3: Tamping and Volume Calculation
- Gently tap the container with a tamping rod or tamper to settle the saturated sand and remove any air voids.
- After tamping, measure the volume of saturated sand and record it as the initial saturated volume.
Step 4: Saturated Sand Drying
- Transfer the saturated sand from the container to a drying pan or dish with care.
- Place the drying pan in the oven and dry the saturated sand at a predetermined temperature.
Step 5: Determine the final dry weight and volume.
- Remove the drying pan from the oven and cool it in a desiccator (optional) to avoid moisture absorption.
- To obtain the final dry weight, precisely weigh the dried sand sample.
- Calculate the final dry volume by measuring the volume of dried sand.
Step 6: Volume Change Calculation
- Subtract the final dry volume from the initial saturated volume to calculate the volume change.
- Volume change should be expressed as a percentage of the initial saturated volume.
Step 7: Analyze and Interpretation
- Analyze the findings and compare the volume change to project specifications or industry norms.
- If the volume change exceeds acceptable limits, it may indicate potential sand stability issues.
Method 9: Analysis of Shape and Surface Texture
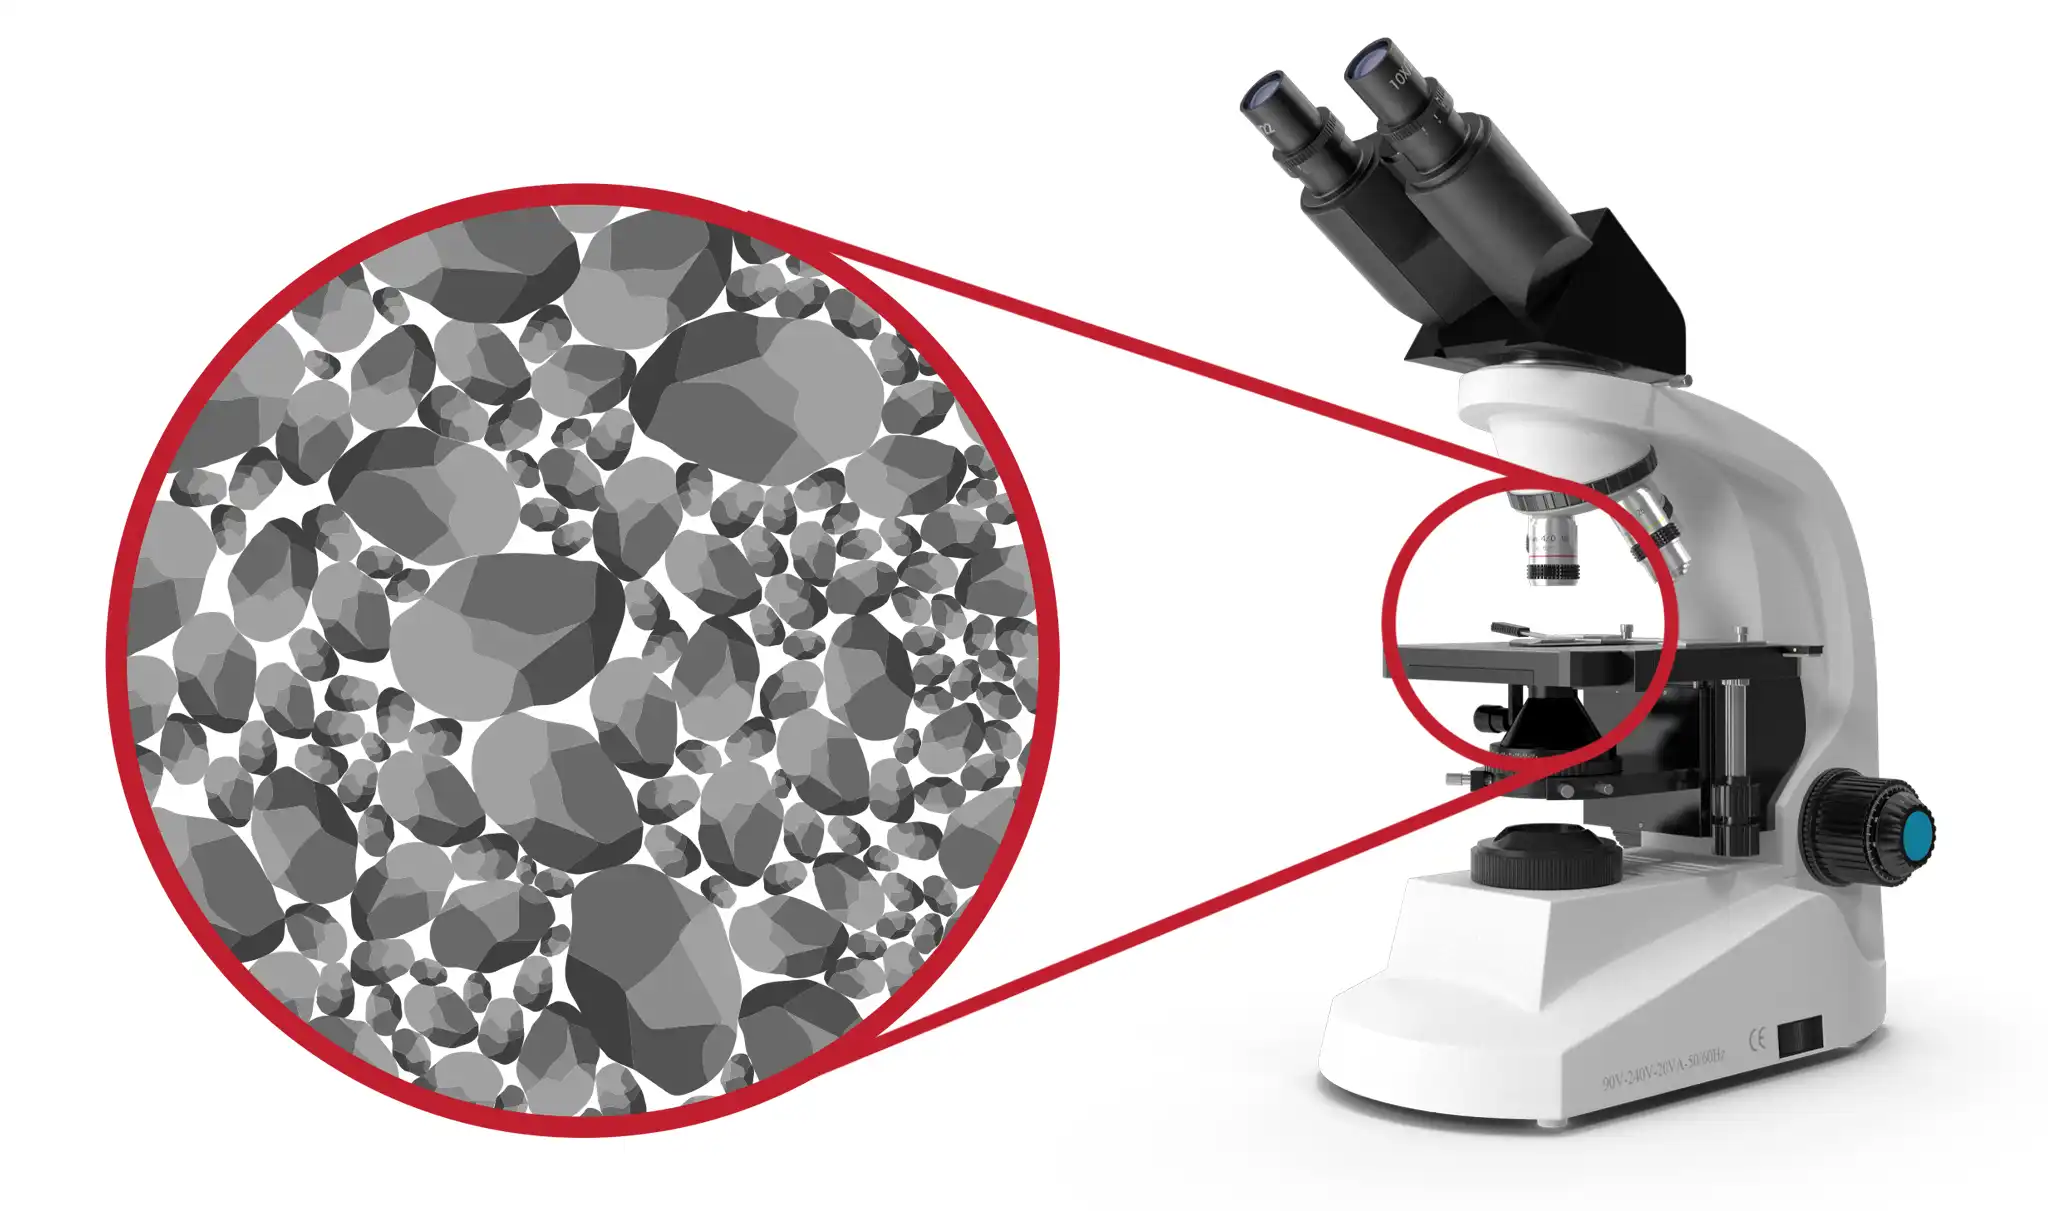 The shape and surface texture of sand particles can have a significant impact on the workability and flow of concrete mixes. Sand with angular particles may require more water to achieve proper workability, potentially reducing the strength of the concrete. Sand testing for shape and surface texture ensures that the sand used in construction is easy to mix and place, resulting in more efficient building practices.
Apparatus:
- A sample of sand
- Binocular or optical microscope
- Balance analytical (accuracy to 0.01 g)
- Beaker or measuring cylinder
Procedure:
Step 1: Gathering and Preparing Samples
- Take a representative sand sample from the site, making sure it is clear of debris and contaminants.
- Allow the sand sample to air-dry to remove any moisture.
Step 2: Prepare the sample
- Take a tiny amount of dried sand and weigh it using the analytical balance.
Step 3: Dispersion
- Fill a beaker or measuring cylinder halfway with the weighted sand sample.
- Pour in enough water to disperse the sand particles. The water level should be significantly higher than the sand level.
- Gently stir the mixture to ensure that the sand particles are evenly distributed.
Step 4: Microscopic Examination
- On a microscope slide, place a drop of the dispersed sand-water mixture.
- Cover the slide carefully with a coverslip to prevent evaporation and maintain a clear view during analysis.
- Examine the sand particles with a microscope at a suitable magnification (typically 10x or higher).
- Examine the sand particles' shape and surface characteristics, noting any irregularities, angularity, or smoothness.
Step 5: Optional Image Capture
- If desired, use the microscope's imaging system to capture images of the sand particles.
- The images can be used for further investigation and documentation.
Step 6: Data Analysis
- Analyze the microscopic images or observations to determine the sand particles' predominant shape and surface texture.
- To quantify the shape and surface characteristics, use relevant metrics or indices (such as the percentage of angular particles or roundness).
Step 7: Check against Standard Specifications
- Compare the sand sample's shape and surface texture to standard specifications or industry guidelines for concrete aggregates.
- Determine whether the sand sample meets concrete mixes' recommended workability, strength, and durability criteria.
Step 8: Interpretation
- Interpret the findings to learn how the shape and surface texture of sand particles can affect the performance of concrete mixes in specific construction applications.
Make informed decisions about the sand sample's suitability for specific projects or consider blending it with other materials to achieve the desired concrete properties.
Is it Possible to Get the Tested C Sand in Bangalore?

Yes, it is possible to get tested for C Sand in Bangalore. While it may be difficult to find dependable sources, Alpha C Sand stands out as the best in C sand manufacturing and supply in Bangalore. With a commitment to quality, Alpha C Sand provides C sand that has been rigorously tested for critical parameters such as sieve analysis, moisture content, specific gravity, and compressive strength. Their distinct properties ensure that the C sand meets construction standards, providing optimal strength and durability for various construction projects in Bangalore.
Conclusion:
Sand testing is an important part of ensuring the quality, strength, and durability of concrete and other construction materials. Construction professionals can assess critical parameters such as particle size distribution, moisture content, specific gravity, silt content, compressive strength, bulk density, permeability, organic content, soundness, shape, and surface texture by using various sand testing methods. These tests allow for precise material selection, proportioning, and adherence to industry standards, resulting in the successful completion of construction projects with safer, more resilient, and long-lasting structures.
Frequently Asked Questions:
1. How do you determine the quality of sand for construction purposes?
Various parameters are evaluated to determine the quality of sand for construction. Sieve analysis is a common method for determining particle size distribution, specific gravity testing for density, moisture content analysis, silt content testing for impurities, and compressive strength testing for concrete suitability.
2. What are the sand testing methods?
Sieve analysis to determine particle size distribution, specific gravity testing for density evaluation, moisture content analysis to assess water content, silt content test to identify impurities, and compressive strength testing to evaluate its impact on concrete strength are all methods of sand testing in construction.
3. What sand testing is required?
Several tests are required to determine the quality of sand for construction purposes. Sieve analysis is used to determine particle size distribution, specific gravity testing is used to determine density, moisture content analysis, silt content testing is used to check for impurities, and compressive strength testing is used to evaluate its effect on concrete strength.
4. How do you test the sand on-site?
Sand testing on the construction site entails performing various tests with portable equipment. Sieve analysis involves passing sand through various sieves to determine particle sizes. A flask and a balance can be used to determine specific gravity. Weighing the sand before and after drying determines the moisture content. A simple sedimentation process is used to determine silt content. Compressive strength testing is possible.